

Find out if your defensive shotgun skills are up to par with this simple test. All you need is a shotgun, a shot timer, and 11 rounds of buckshot. And some targets. And, I guess, a shooting range, too. And eye and ear pro. So actually, you kind of need a lot of stuff. But you can do it. I believe in you.
Details are in the video below, or scroll down to read the full transcript.
Hey everybody, I’m Chris Baker from LuckyGunner.com and it’s been far too long since I’ve done a video about shotguns. So today, I’ve got a shotgun skills test for you to try out at the range. It’s designed with a home defense context in mind. I’m going to go ahead and dive right into the course of fire, then I’ll come back and break down each stage with a little more detail.
Course of Fire
To shoot the test, you will need a shotgun and a shot timer. For ammo, you’ll need 11 rounds of buckshot. You could shoot it with slugs if you really want, but it’s designed with buckshot in mind.
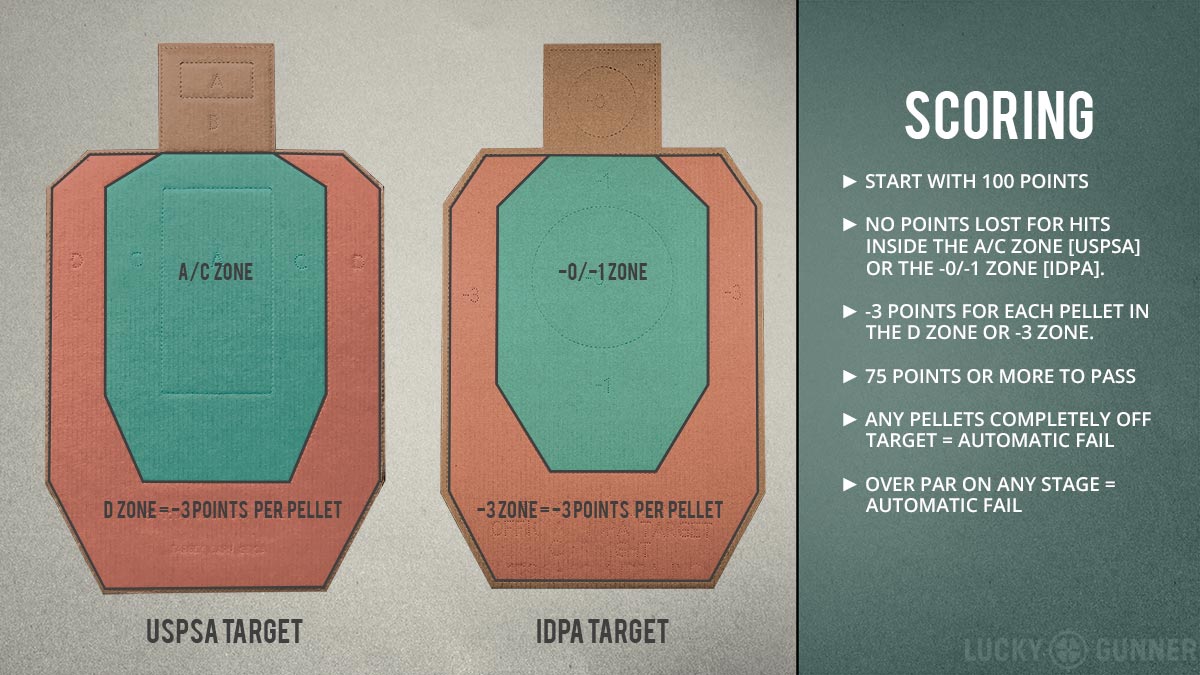
The target is either a USPSA or IDPA cardboard silhouette. You have 100 points to start. All your pellets need to land inside the -0/-1 zone (IDPA) or A/C zone (USPSA). For every pellet in the -3 or D zone, you’ll subtract 3 points from your score. You will need a score of 75 or higher to pass. If any pellets miss the target completely or you go over the par time on any stage, that’s an automatic fail.
In case you want to make this test more challenging, I’ve got some intermediate and advanced par times as well. I’ve shot this test a handful of times so far, and I haven’t made any of the advanced times yet. I know they’re possible, but you’ll have to be pretty quick.
Okay, here we go…
Stage 1
At 15 yards, start at a low ready position. On the signal, fire 1 round.
Basic Par: 2 seconds
Intermediate Par: 1 seconds
Advanced Par: 0.60 seconds
Stage 2
At 10 yards, start at a low ready position. On the signal, fire 2 rounds.
Basic Par: 3 seconds
Intermediate Par: 2 seconds
Advanced Par: 1 seconds
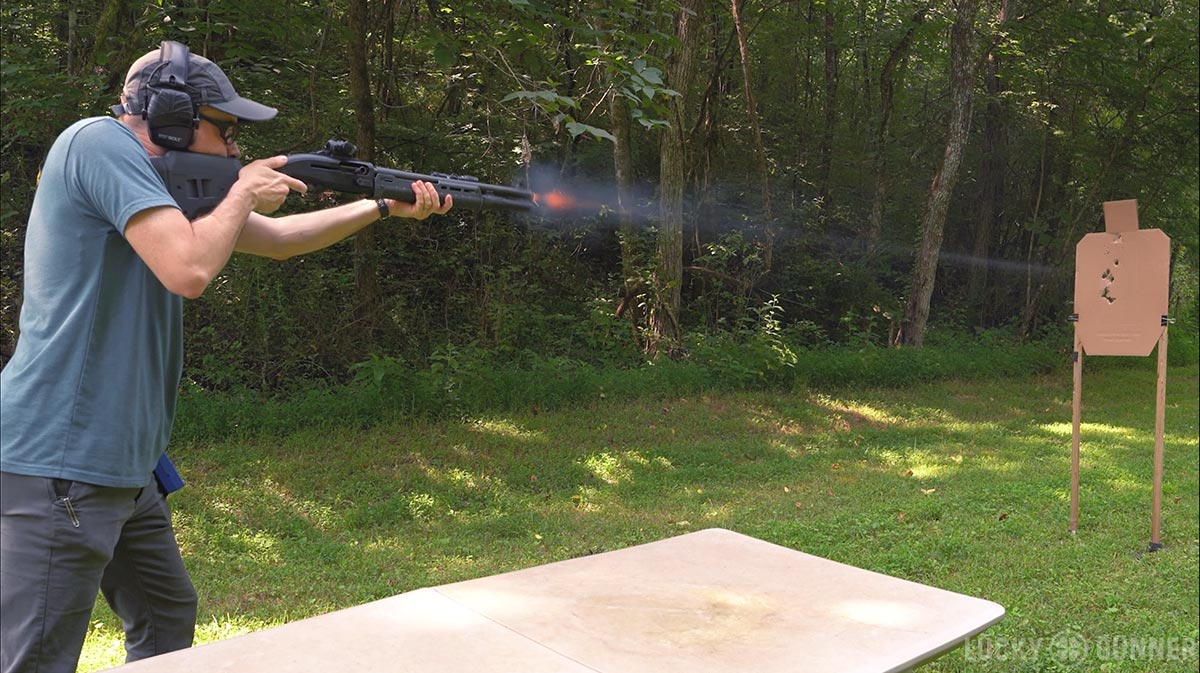
Stage 3
At 5 yards, start with the gun loaded in “cruiser ready” condition. The chamber should be empty with three rounds in the magazine tube. Place the gun on a table beside or in front of the shooter. At the signal, pick up the gun, chamber a round, and fire three shots at the target. Perform an emergency reload with two rounds, and fire those two rounds at the target.
Basic Par: 16 seconds
Intermediate Par: 11 seconds
Advanced Par: 7 seconds
Stage 4
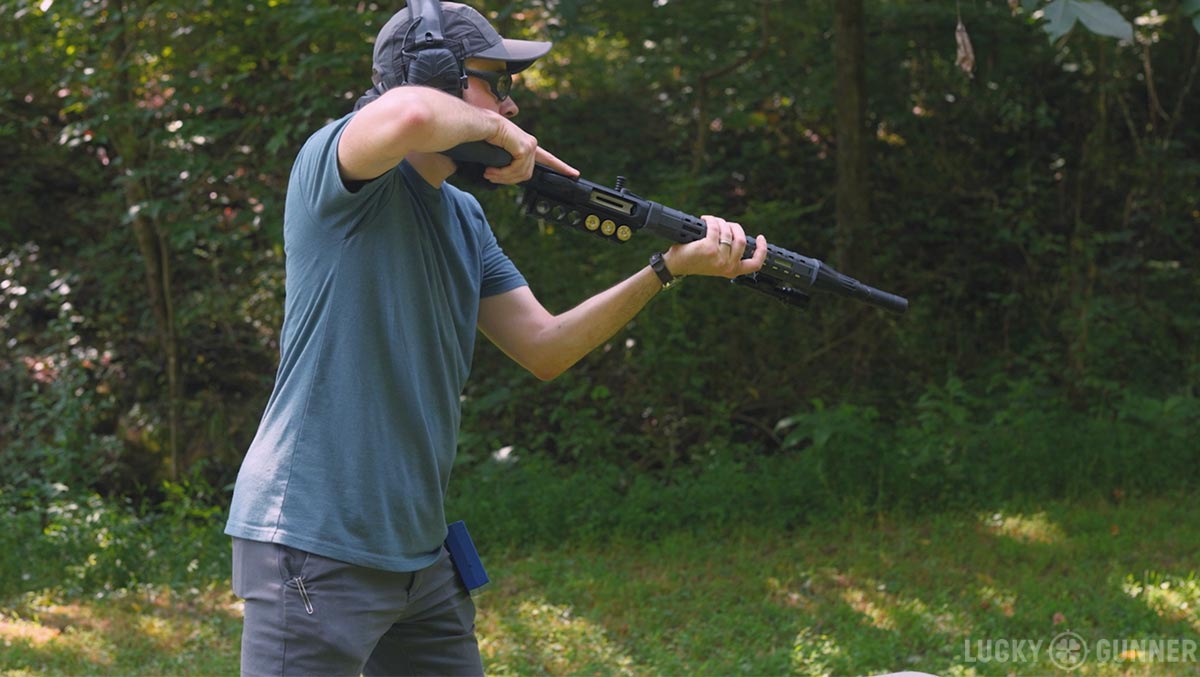
At 3 yards, start at a low ready using a modified compressed firing position. On the signal, fire two rounds at the body of the target. Then take one step back while transitioning to a normal shoulder-mounted stance and fire one round at the head.
Basic Par: 4 seconds
Intermediate Par: 3 seconds
Advanced Par: 1.75 seconds
Here’s a quick-reference PDF score sheet with the course of fire for quick reference at the range (special thanks to Lee Weems for putting that together).
Background
I’ve spent a lot of time trying to find shotgun qualification courses or skills tests that are relevant for defense inside a home or business. Unfortunately, most of the tests out there come from law enforcement qualifications. They tend to include stages that don’t have anything to do with home defense. Most of us don’t need to test our ability to transition to a handgun or shoot slugs at extended range.
So, I pieced together my own shotgun test using modified pieces of other tests. I tried to emphasize skills that are most relevant for private citizens like safe and quick gun manipulation, shot accountability, and mounting the gun. These are some of the skills emphasized most by the defensive shotgun instructors I know. And they’re also some of the skills I’ve seen lacking the most in people who don’t have much training or experience with shotguns.
Stages 1 and 2 Breakdown
Let’s take a closer look at the first two stages. The focus is on mounting the gun quickly and shot accountability. It is not difficult to hit the target at 15 yards with a shotgun. But it’s a little more challenging to get all your pellets on target.
We’re accountable for every pellet that leaves the gun. Missing is unacceptable. So you need to pattern your shotgun with the buckshot you have for home defense. Make sure that pattern is not too wide. A tight pattern gives you a bigger margin of error, so that if you get a hit that’s not quite dead center, all your pellets are still going to be on the target and not off into the unknown.
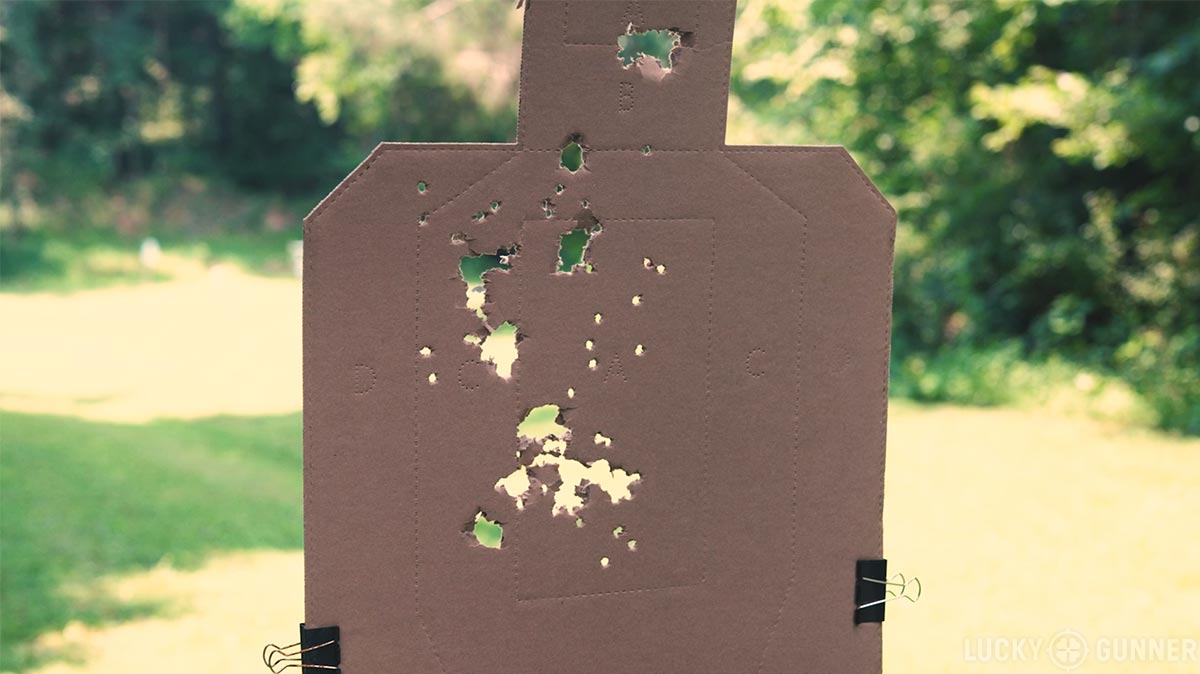
The longest range in most homes is a lot less than 15 yards. But if you can keep all those pellets on target at 15, you can definitely do it at 10 yards or 5 yards or whatever you’re working with.
On my first run of the test, I used my Beretta 1301 with some 00 buck that doesn’t pattern all that well. I kept all my pellets on the silhouette, but just barely. I know some of the premium self-defense buckshot is tough to get right now. You have to use whatever you can find. Just make sure you know what kind of spread you’re going to get with that load at various ranges.
For stage two, we have two shots instead of just one. That let’s us evaluate recoil control, and, if you’re running a pump shotgun, your ability to cycle the action efficiently.
Stage 3 Breakdown
Stage 3 could probably be a test all on its own. There’s a lot going on here. This stage comes from an old FBI shotgun qual with one major change — starting on the table in cruiser ready condition is something I borrowed from Tom Givens’ Rangemaster test.
The target is at 5 yards, so you really shouldn’t have any problem with accuracy. That’s because this stage is all about manipulations. It includes loading, mounting, running the action, and an emergency reload. We add time pressure and a round count you have to keep mental track of and it becomes a really good test of whether or not you have achieved unconscious competence with handling your shotgun.
For the starting position, you can stage your shotgun in whatever ready condition you normally use in your home. I recommend a cruiser ready condition. There are different variations of that, but it essentially means you have rounds in the mag tube, but the chamber is empty. There are some other nuances that I discussed in a video last year if you want more details on why I do it that way.
I want to emphasize here, this is a skills test. It’s not a scenario. It’s not supposed to be a simulation of a real life encounter or anything like that. The idea of this part of the stage is just to evaluate your ability to get the gun from a ready condition to putting rounds on target with some time pressure.
For the reload part, you don’t have to necessarily have your shells on a side saddle or other shell carrier on the gun. If you want, they can be in your pocket, or just on the table. A gun-mounted shell carrier is a good idea, but they are really not as essential as we’d like to think. Conflicts where someone has a shotgun loaded with buckshot or slugs almost never involve more than two or three shells fired.
I put a reload stage in this test, not because reloading is a super useful skill on its own, but because working on reloads is a great way to become intimately familiar with how your shotgun works. If you’re good at reloading the shotgun, you’re probably competent and confident with all the other necessary manipulations.
Stage 4 Breakdown
Stage 4 is based on an old LAPD SWAT Team qual. Basically, it’s a Failure Drill: two to the body, one to the head. But this time, we fire the body shots from a compressed position, and then we take a step back and mount the gun before the head shot.
If we’re in tight quarters or the target is super close, we don’t want to stick the gun all the way out there. But then if the space were to open up, we need to be able to smoothly transition back to a shoulder mount.
The technique I’m using in the demo here is called short-stocking. I did a video on it a couple of years ago if you want to know more about that. You could also use an under-arm type position if you prefer. That’s actually what the original LAPD test called for. However you do it, the idea is to reduce the amount of gun you have sticking out in front of you.
You might think of this as a more obscure shotgun skill and not something that should be in a core skills test. I actually think it’s pretty important to know how to do, and it’s really not that difficult to figure out. If I had to go check out a bump in the night, I’d much rather move around my house with a handgun than a shotgun. The shotgun works better as a bunker-in-place weapon. But even if we intend to use it that way, there’s no guarantee we won’t ever have to move around with it. Between furniture and doorways and other obstacles, a shoulder-mount could sometimes be counter-productive.
If you’re using a bullpup shotgun, this is your one moment to shine. A compressed position is not as necessary. You also might not even be able to do the short stocking technique anyway depending on how the gun is set up. So for this stage, you can just fire all three rounds with the gun shouldered.
For a stockless shotgun like a Mossberg Shockwave, you still need to use a compressed position for those first two shots. I think the best way to run these guns is the technique pioneered by Rhett Neumayer from Demonstrated Concepts. He gets a cheek weld with the pistol grip. It’s a nice, compressed position that gives you a really fast sight picture. He sells a recoil strap that makes this technique a lot easier. You could use the cheek weld position for the whole test, including all of Stage 4.
Here are my best results on the test so far.
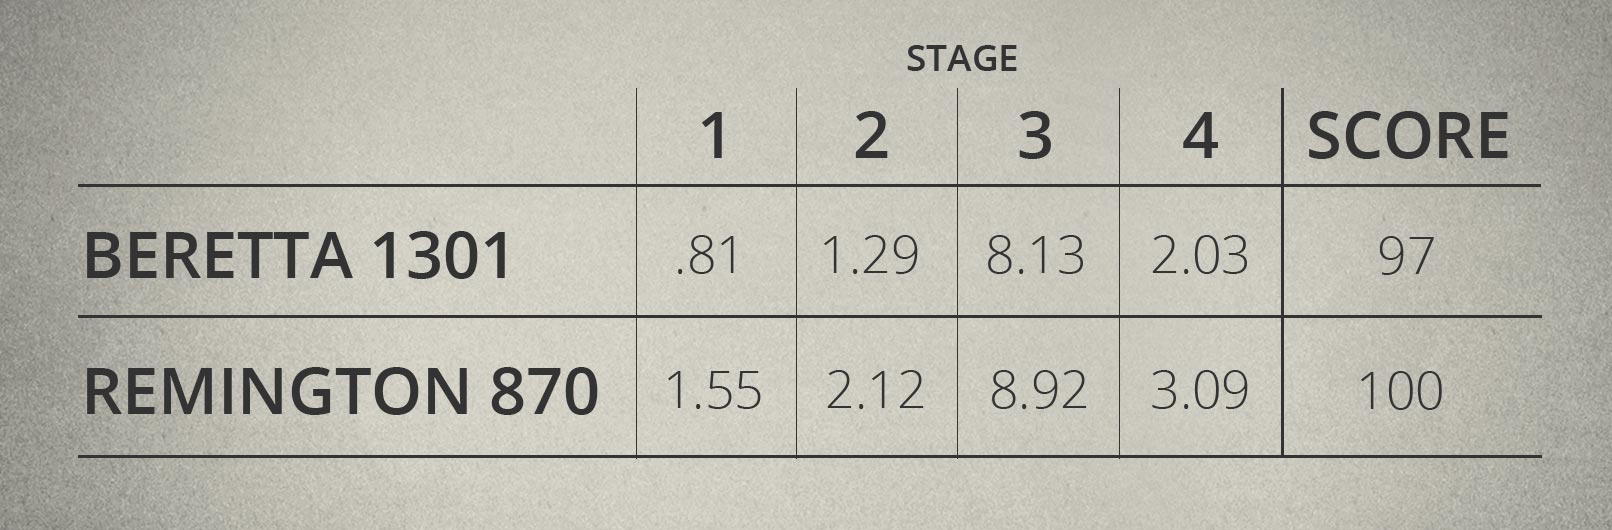
I know some of you can probably beat those times. Give it a try at the range and let me know how you do.
If you need some ammo for your shotgun, of course, you can get that from us with lightning fast shipping at LuckyGunner.com.
The post The Home Defense Shotgun Skills Test appeared first on Lucky Gunner Lounge.