Most shotguns with 18 to 20-inch barrels have a plain ol’ cylinder bore with no choke. Is that a problem? There is some debate about whether defensive style shotguns loaded with buckshot can even benefit from choke tubes. We fired some test patterns to find out. Like… a whole bunch of ’em. Four different buckshot loads, four different choke sizes at five-yard increments from five to 25 yards.
Details are in the video below, or scroll down to read the full transcript.
Hey everybody, I’m Chris Baker from LuckyGunner.com. Today, I’m going to talk about using choke tubes in home defense shotguns. We shot a bunch of buckshot with different choke sizes to see what kind of patterns we would get. We’ll look at those results in just a minute. First, a quick introduction to chokes for those who might be new to this topic.
What Are Shotgun Chokes?
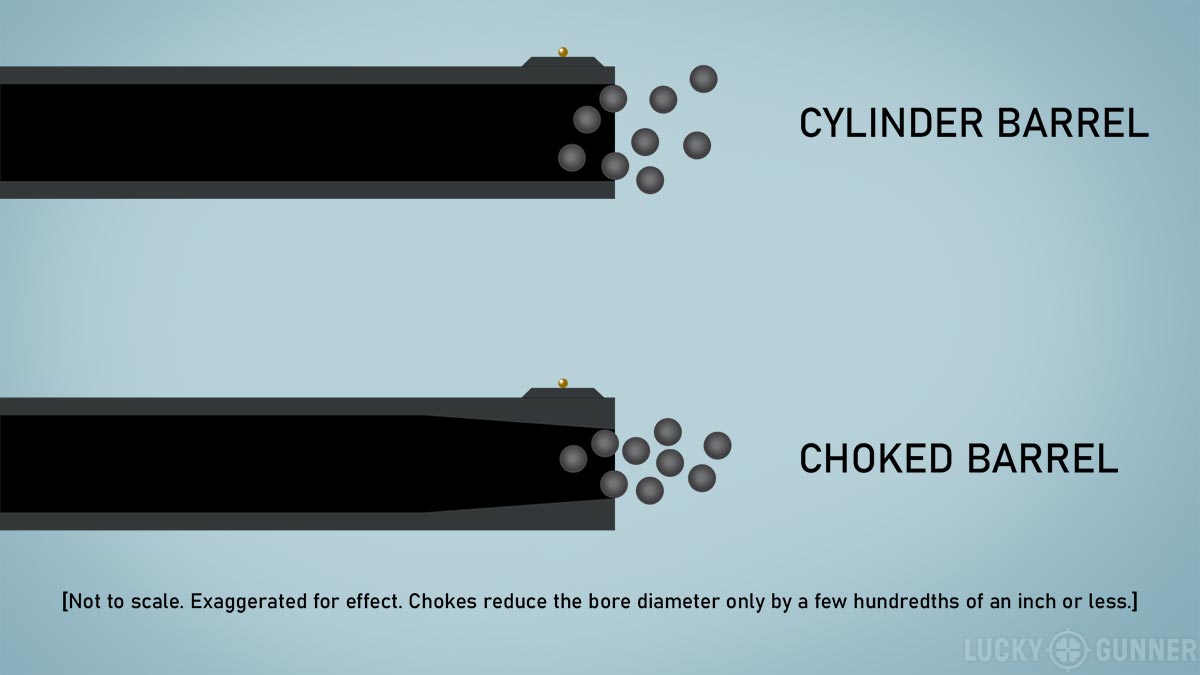
Most shotguns that are made for defensive use or law enforcement have what’s called a cylinder bore or open choke. That means the inner walls of the barrel are straight all the way down. If your shotgun has an 18 to 20-inch barrel, it’s probably a cylinder bore.
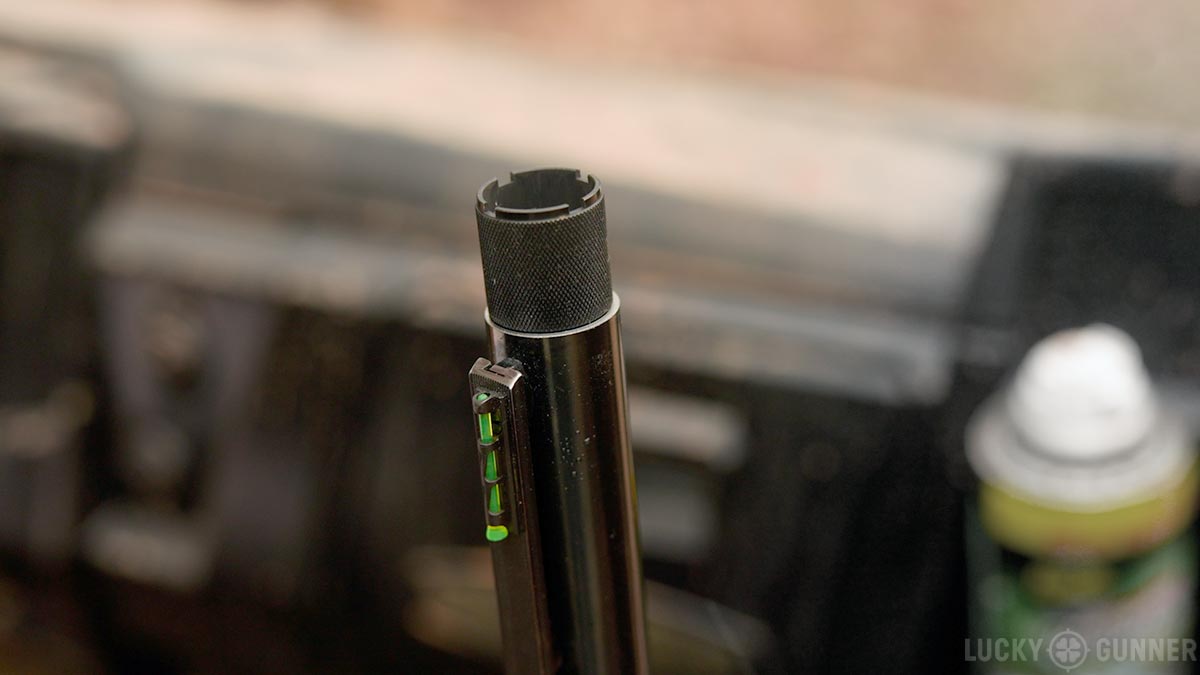
There are exceptions, like the newer version of the Beretta 1301 Tactical which is threaded at the inside of the muzzle to accept screw-in choke tubes. Some shorter barrels even come with a fixed choke. In either case, a choke simply means the inner walls of the last couple of inches of the barrel are tapered inward slightly. This funnels and constricts the shot as it exits the barrel to give you a tighter and denser pattern on target.
Chokes are most often used on shotguns for hunting or shooting clay targets, but there’s no reason a defensive shotgun can’t have chokes, too.
Threading A Shotgun Barrel For Choke Tubes
If your shotgun has a plain cylinder bore and the metal is thick enough, you can usually have a gunsmith thread it to accept choke tubes. Or you can buy or rent the tools and attempt to do it yourself. That’s the route I took with the Winchester 120 Ranger shotgun that I showed you guys a few weeks ago. When I cut down the barrel to make it more suitable for home defense, that removed the part that was threaded for choke tubes. So I decided to continue the DIY experiment and rent the choke threading tools from 4drentals.com.
I would not recommend attempting this yourself if you don’t know what you’re doing. I didn’t really know what I was doing, but I was willing to accept the risk of potentially ruining a barrel for the sake of video content.
That said, it’s a fairly simple process. You just ream out the end of the barrel with one tool and then thread it with a tap. Ideally, you would put the reamer on a lathe. I don’t have a lathe, so I used a power drill. That worked fine eventually, but it was a pretty tedious process to figure out just how fast to turn the drill and how much pressure to put on it.
The cost of the tool rental, plus some cutting oil, plus shipping back and forth was about $100. Most gunsmiths will not charge a whole lot more than that to do the same thing, only better and faster. So if you’re only doing one barrel, the DIY rental option might not be ideal.
Choke Tubes for Home Defense
Okay, so we’ve got a shotgun here that’s setup for home defense and now it’s threaded for choke tubes. How does that help us?
For home defense, we usually use buckshot and ideally, we use buckshot with a fairly tight pattern. I don’t want to get too much into the why behind that because I’ve covered that in other videos. Basically, buckshot is more effective if all the pellets impact close together. There’s also the issue of shot accountability. We don’t want stray pellets flying off a foot away from our point aim so they can hit someone other than our intended target.
I’ve always been a fan of Federal Flite Control buckshot. It has a special wad that holds the pellets together so that, even without chokes, you get a much tighter pattern than any other buckshot. But with demand for ammo being so high the last couple of years, Flite Control has been really difficult to find. We finally got a shipment a few days ago for the first time in forever. By the time you’re watching this, I would not be surprised if it’s sold out already. So for the time being, you might have to settle for some buckshot other than Flite Control.
You could also load up your shotgun with slugs. There’s some evidence that buckshot might be more effective than slugs at close range. Some slugs are prone to severe over-penetration. But if you choose your slug load carefully, it can be a viable option.
If you want to stick with buckshot, the general rule of thumb I’ve always heard is that chokes can help reduce your pattern, but if your choke is too tight, it can deform the pellets so that they don’t fly straight and you actually get a bigger pattern. I did a quick demo of this a couple of years ago in our two-part series about buckshot. But I wanted to revisit this idea and do a more in-depth test.
Choke Tube Buckshot Test
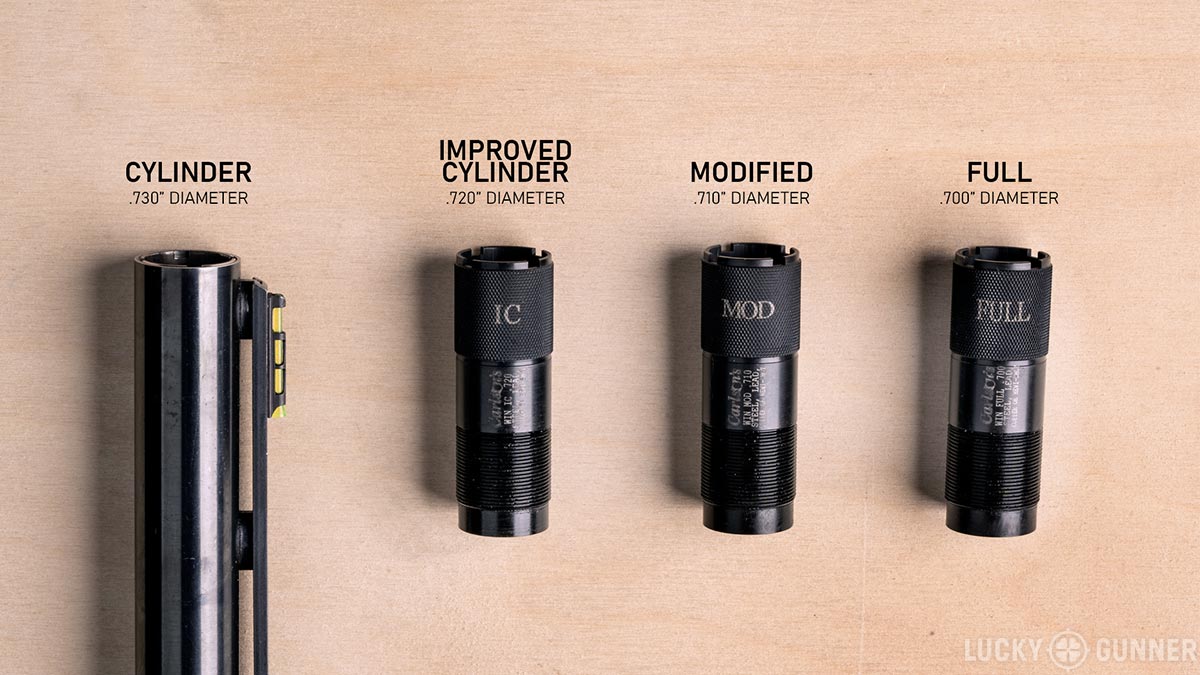
We used four different choke sizes including the cylinder bore. Choke sizes are designated by names that can be kind of confusing if you don’t have them memorized. We used an improved cylinder choke, a modified choke, and a full choke. There are tighter choke sizes intended mostly for birdshot only. There are also sizes in between these, but we tried to pick the most common chokes.
We patterned four different buckshot loads with each choke at five-yard increments from five to 25 yards. We’re going to focus on the 15 to 25 yard patterns. You nearly always get a fist-sized pattern when you’re only five yards away. At 10 yards, there’s some variation in pattern size, but almost any load will perform acceptably at that distance. Regardless of load or choke size, all of our patterns at ten yards were between three and seven inches.
For a lot of you, this might be the end of the story. Based on how your home is laid out, you might not have any line of sight that’s longer than ten yards. I still think there’s value in knowing how your shotgun can and does perform at longer ranges. But we’ll leave it to you to decide whether this 15 to 25-yard data is relevant to your situation.
You can get a lot of variation in pattern size from one shot to the next even with the same load, at the same distance, using the same choke. So we fired two patterns for every test. If I was actually patterning a load that I planned to use for self-defense, I would fire at least five. Even when a particular load is prone to flyers, you might have to fire a few rounds before one shows up. We want to know what the buckshot spread looks like in a worst case scenario, so we’re going to show you the measurements from the larger of our two patterns. If you want to see all the raw data we gathered, that is available right here.
Fiocchi Defense
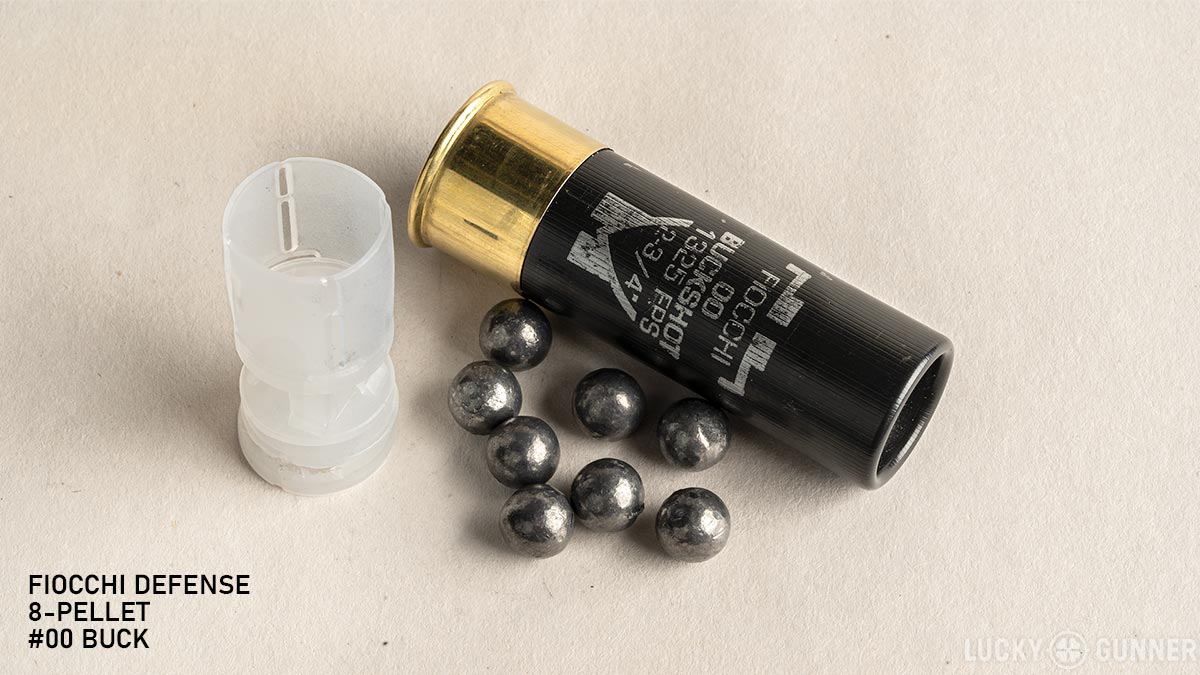
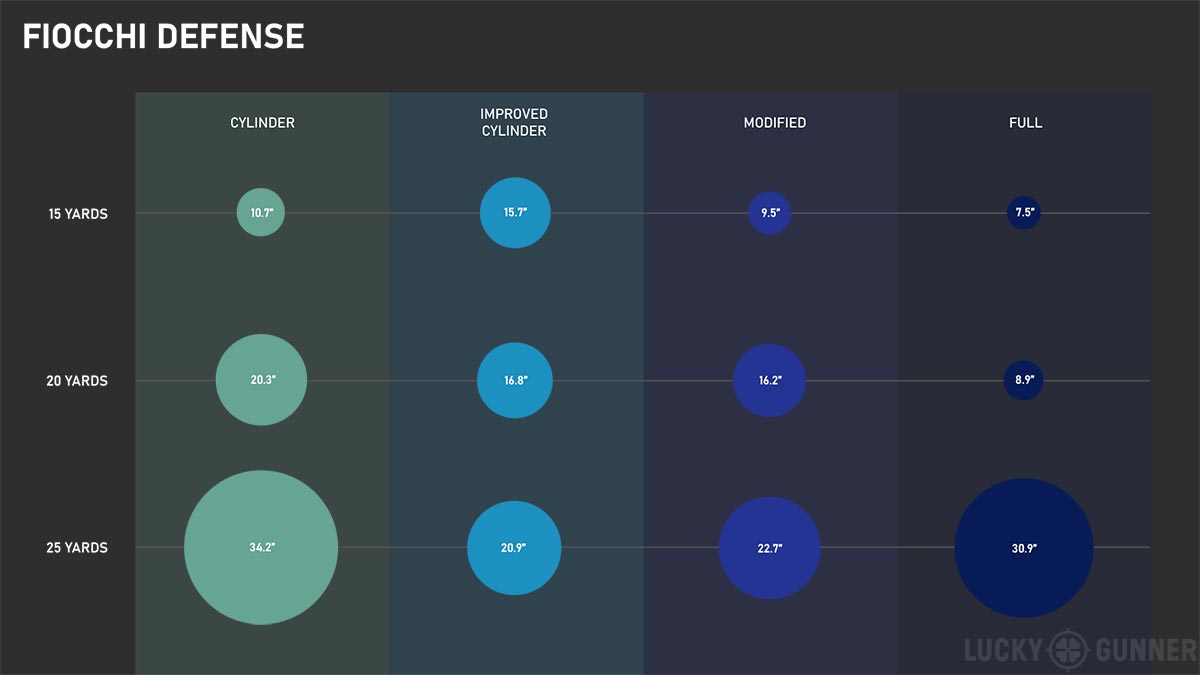
Our first load is Fiocchi Defense with eight pellets of #00 buckshot. This is a very basic, inexpensive load with unplated lead pellets and no buffering compound. At 15 yards, the modified and full chokes patterned a little better than the plain cylinder bore. The improved cylinder was actually much wider.
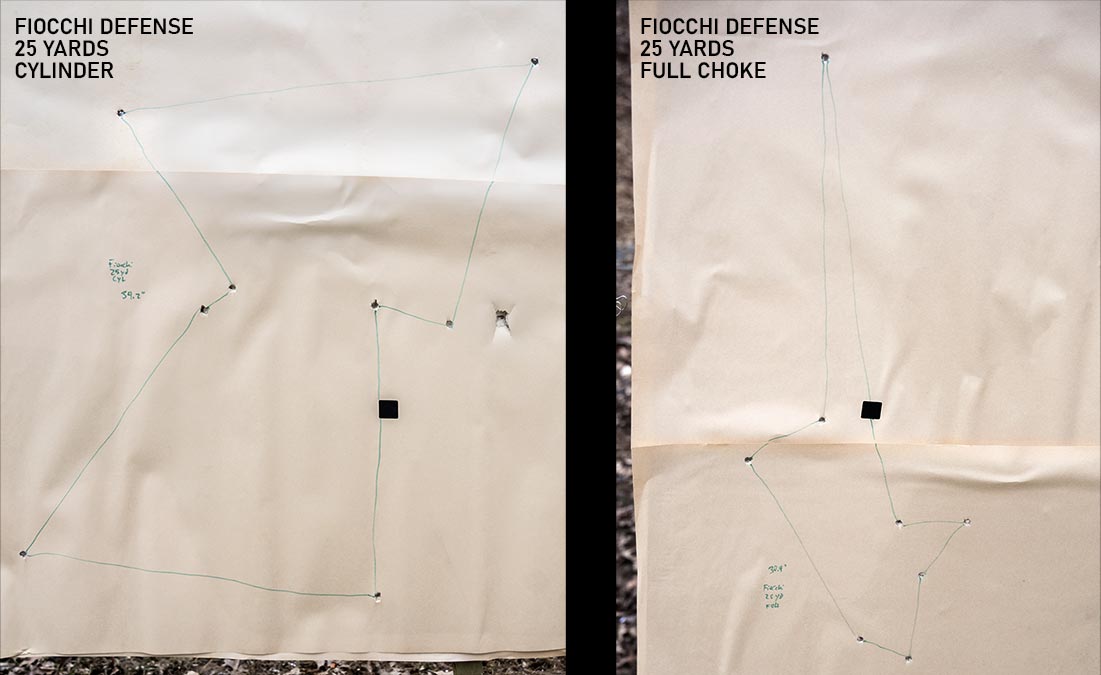
At 20 yards, the cylinder bore gave us the widest pattern. The improved and modified were a little tighter. The full choke gave us the best pattern by far – still under 10 inches, which is impressive at this range. But check out what happened at 25 yards. With both the cylinder and the full choke, we got patterns over 30 inches. The improved and modified chokes were not all that great either.
But it’s worth taking a look at the actual patterns, here. With the cylinder bore, the whole pattern is huge. But if we look at the full choke, the best seven of the eight pellets give us a 14-inch pattern. We just have one single flier that went way out there.
This might be a case where the constriction of the choke caused some deformation in that one pellet and that’s why it flew way off from the rest.
Nobel Sport Low Recoil
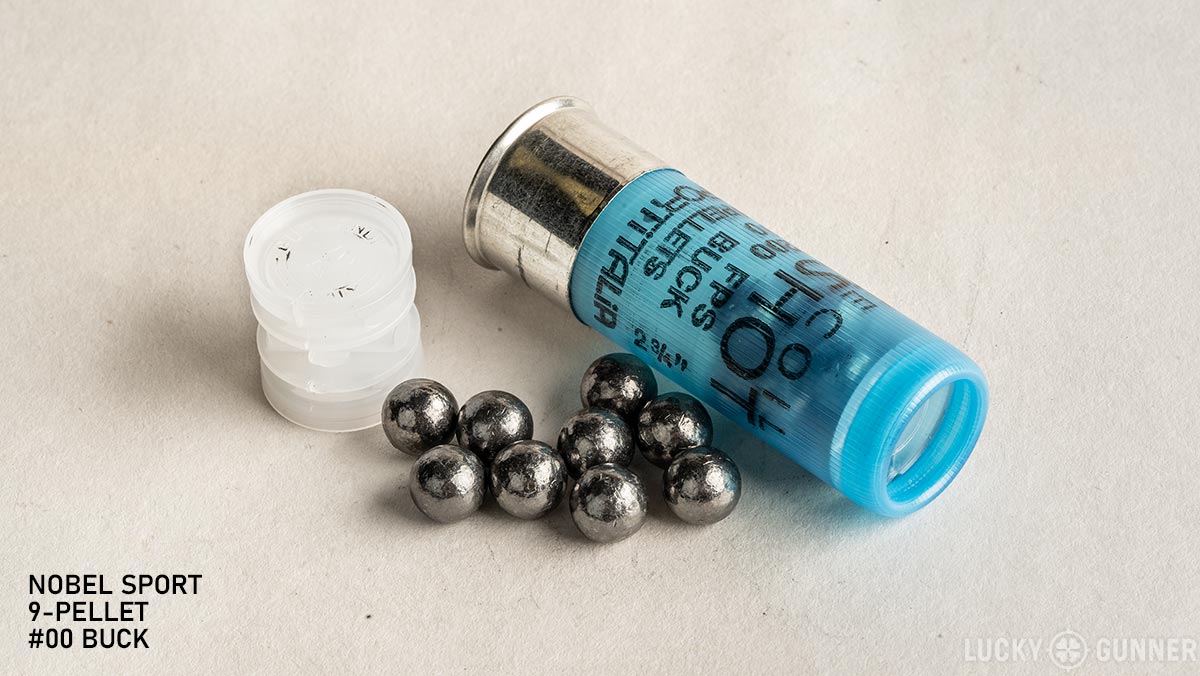
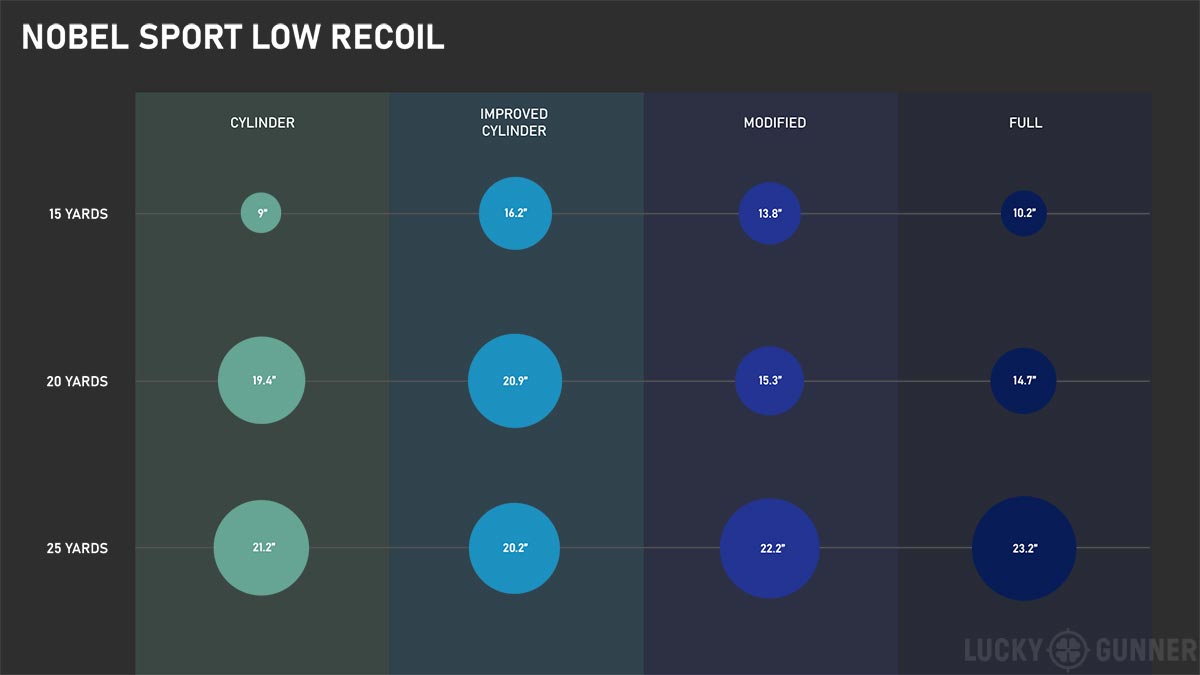
Next, we’ve got another very basic unplated buckshot load – Nobel Sport low recoil nine-pellet #00 buck. At 15 yards, the cylinder bore actually did a little better than all the others. Moving out to 20, the modified and full chokes had the smallest patterns. At 25, all four chokes had similar performance. Every pattern was right around 20 to 23 inches. Nothing great, but oddly consistent.
So if there’s any takeaway so far, I think it’s that chokes cannot perform miracles on cheap buckshot. At 15 yards and beyond, if you want the smallest pattern you can get, a choke might help, but the results can be unpredictable.
Next, we’ve got a couple of premium-level buckshot loads. Let’s see if those do any better.
Winchester Defender
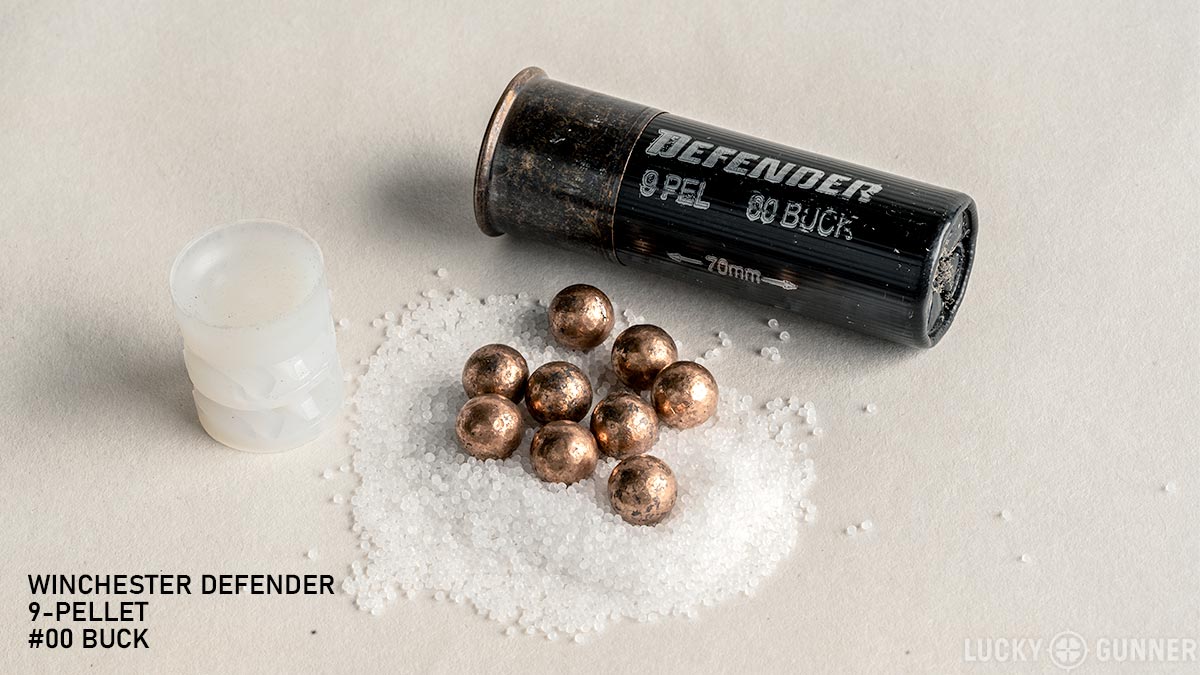
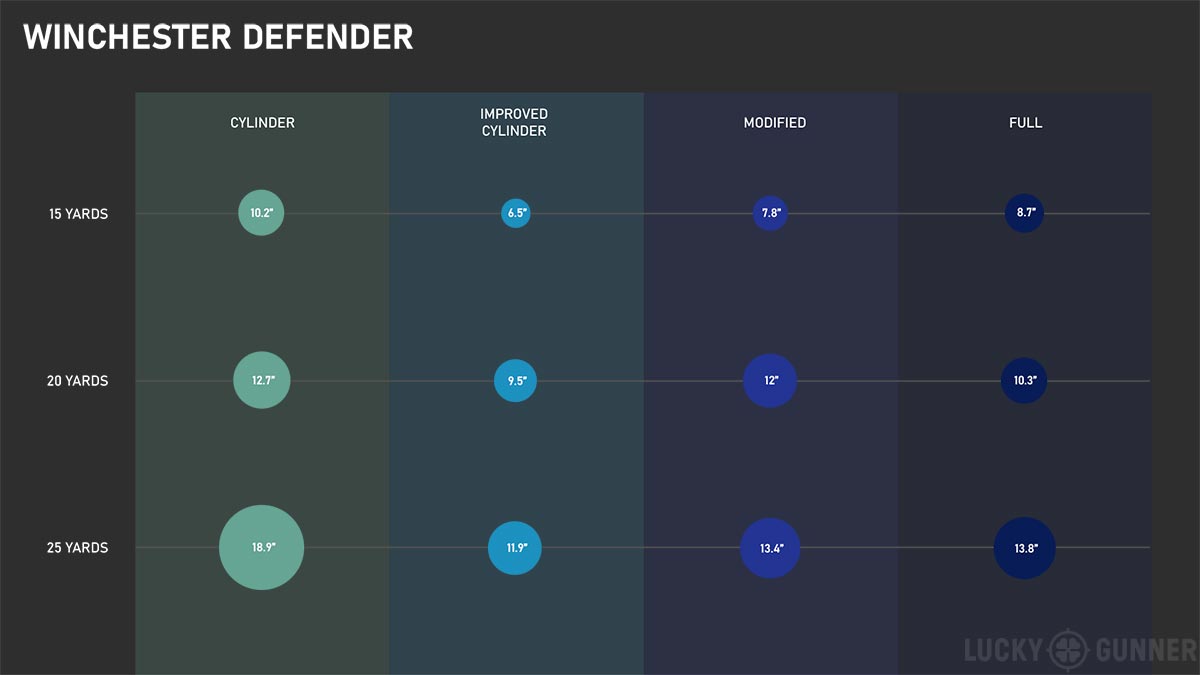
Winchester Defender nine-pellet #00 buck is copper-plated and buffered – those are both features designed to help prevent the pellets from deforming. At 15 yards, all of our patterns look decent, but they’re a bit smaller with the chokes. At 20 yards, everything is still fairly tight. Two of the chokes seem to be helping a little. When we get out to 25, the cylinder bore is at nearly 19 inches, the choked patterns are 12 to 14 inches.
That pattern with the cylinder bore opened up thanks to a single flier. Otherwise, it would have been tracking right along pretty close to the choked patterns. Did the use of chokes prevent those patterns from having any flyers? It’s tough to say – flyers can happen for a lot of reasons, some of which have nothing to do with chokes. In any case, the chokes did seem to help overall with this load, even if it was a fairly minor difference. What made a much bigger difference was the quality of the buckshot load itself. Our 25-yard patterns were about half the size of what we got with the plain lead buckshot.
Federal Force X2
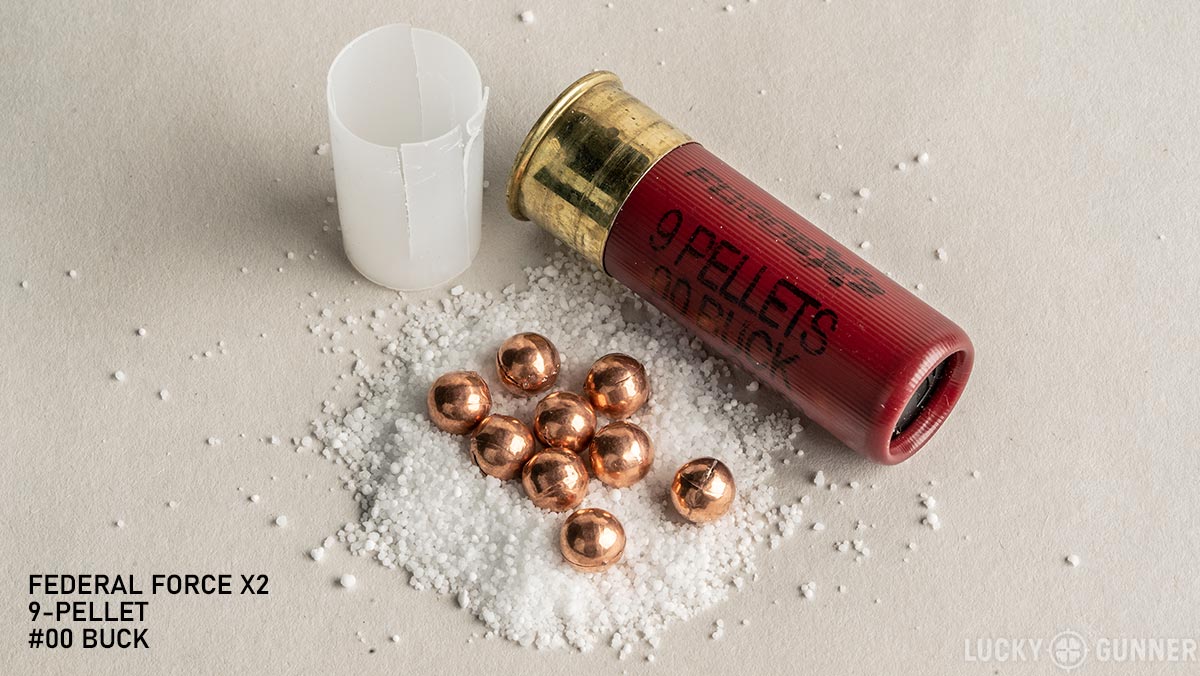
Finally, we’ve got the Federal Force X2 buckshot. This is a somewhat new load from Federal. The pellets have a unique shape that’s meant to split into two when they hit a soft target. This supposedly creates a more effective wound channel and also helps to reduce over penetration. I can’t vouch for those claims, but maybe we’ll test it in ballistic gel someday. For now, we’re just looking at the shot pattern.
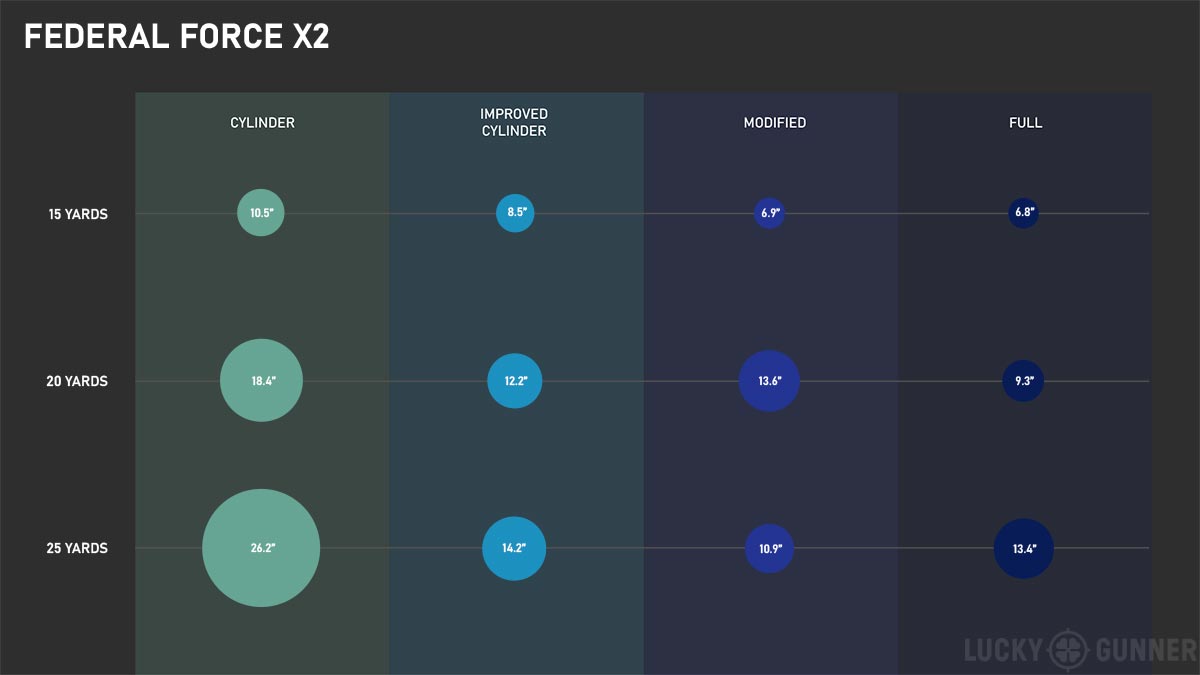
Our 15-yard patterns looked a lot like what we got with the Winchester load: ten and a half inches with the cylinder bore; a couple of inches less with the chokes. At 20 yards, our cylinder bore pattern had a flier that opened the group up to 18 inches with the others staying much tighter. At 25 yards, the cylinder bore had a pretty wide pattern overall. The choked patterns were within about two or three inches of what they did at 20 yards.
So again, we’ve got, at least, the suggestion that the chokes might not only reduce the overall pattern size, but might also help prevent flyers for plated and buffered buckshot. I wouldn’t want to say that’s a certainty without doing a lot more testing, but it seems plausible.
Lessons Learned
We shot and measured a total of 128 patterns. 18 of those patterns had flyers with a single pellet that was more than five inches from the rest of the group. Only three of those fliers happened with the plated and buffered loads, and those three all took place with the cylinder bore, not with the chokes.
At 15 yards and beyond, it looks like any choke is probably better than a cylinder bore if you’re not using Flite Control or slugs. It’s a lot harder to pin down which choke size is the best. Contrary to what I said in that previous video, it looks like a full choke is not necessarily too much. You just have to test it in your shotgun.
But chokes or no chokes, I think the more definitive lesson here is that plated and buffered buckshot is definitely the way to go. Even inside 15 yards, it seems to be more consistent and predictable. Save the plain lead stuff for practice – think of it the same way you would full metal jacket pistol ammo.
Whatever buckshot you decide to try, be sure to get it from us with lightning fast shipping at LuckyGunner.com.
The post Choke Tubes for Home Defense Shotguns appeared first on Lucky Gunner Lounge.
