
The .22 LR bolt action rifle we covered back in April’s “backyard sniper” video is an exceptional pest eliminator. But it’s also heavy and kinda slow when those critters don’t go down with the first shot. So I got a new one — this time, it’s a DIY not-Ruger lightweight 10/22 build. Today, we’re going over the parts used in that rifle so you can tell us why they’re all wrong.
Details are in the video below, or scroll down to read the full transcript.
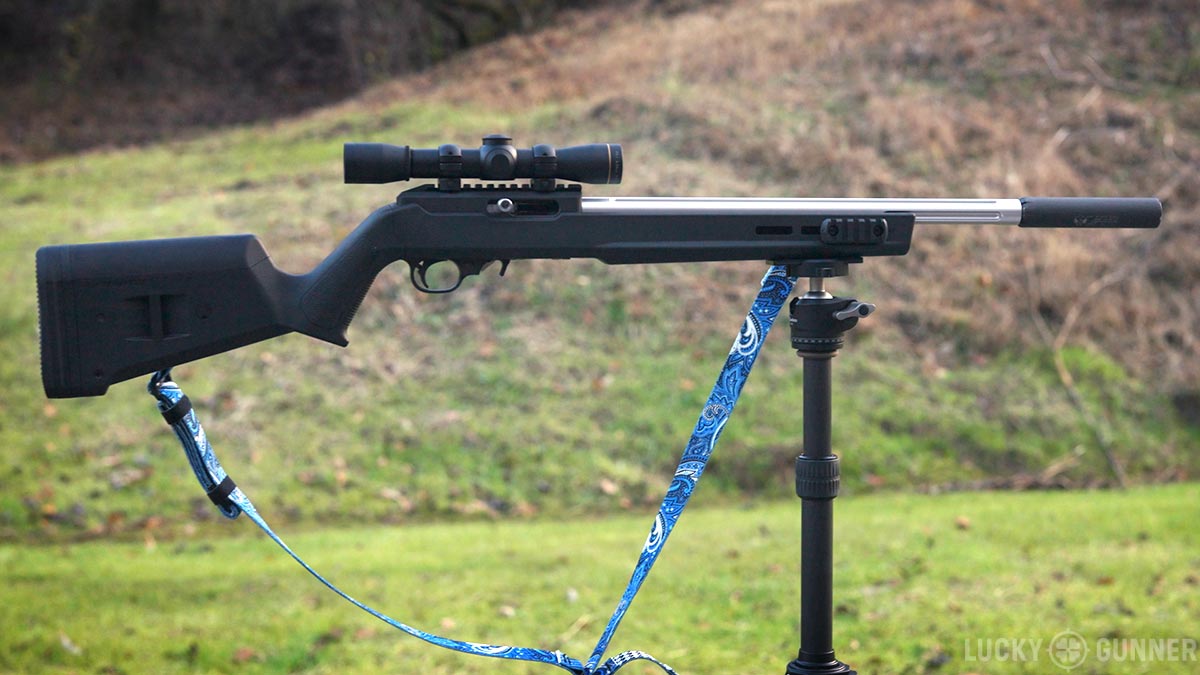
Hey everybody, I am Chris Baker from LuckyGunner.com. Back in April, I showed you guys the “backyard sniper rifle” – a suppressed Savage MKII bolt action .22LR specifically configured for the mission of defending my garden and chickens. The parameters of that mission have changed somewhat over the last few months, so, of course, I had to set up a new gun. I thought you guys might want to see what I came up with. So first, let’s take a look at the hardware and then I’ll go into the why behind everything.
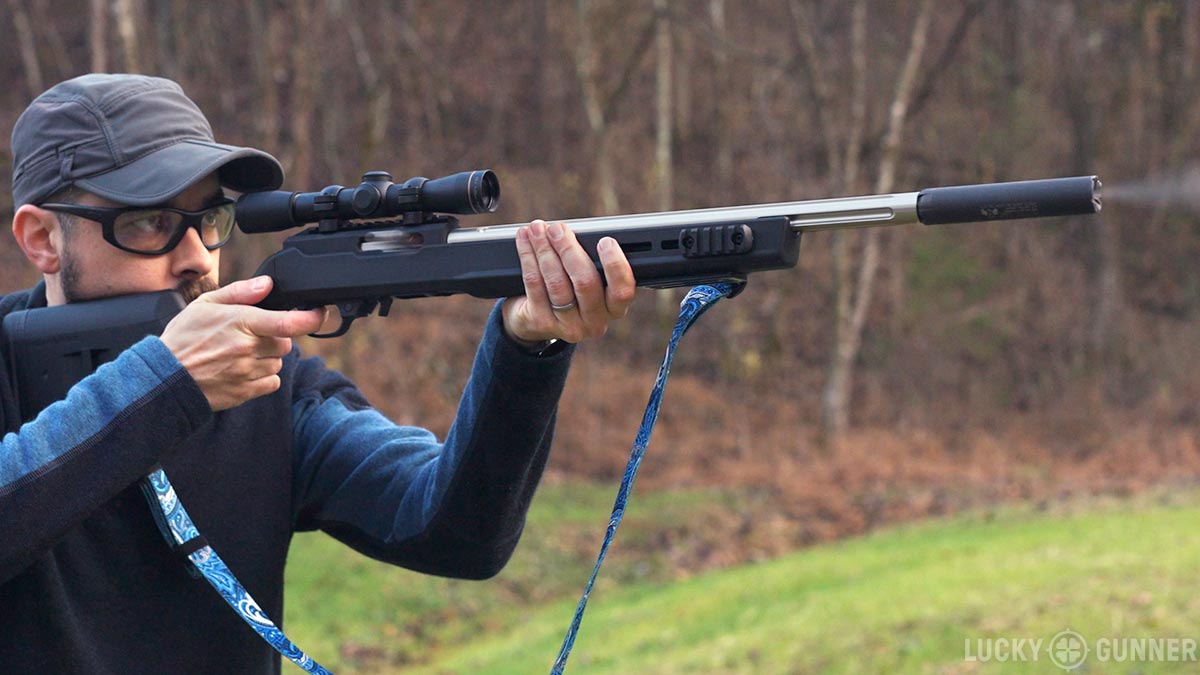
The gun is a Ruger 10/22… except, not really. I assembled it from various parts, only a few of which actually came from Ruger. The custom 10/22 world is new territory for me. I knew that it was possible to build a 10/22 without any actual Ruger parts. But after I started the process, I was surprised at just how easy it was. This is not a tutorial video. There are already plenty of useful resources out there for that. But it’s pretty straightforward – you just need a receiver, barrel, stock, bolt assembly, trigger assembly, and some miscellaneous hardware.
For this rifle, I used a Magpul Hunter stock, Brownell’s receiver, Tactical Solutions X-Ring barrel, Kidd Innovative design bolt assembly, bolt handle, and buffer, a Ruger BX trigger pack (that includes the trigger group, safety, and mag release), and I replaced the Ruger bolt release with a Volquartsen automatic bolt release – that’s the little silver part you can see peeking out there.

That’s it for the rifle itself. It’s a pretty simple design. The barrel is secured with a couple of screws. The bolt and the trigger just drop right in. All the complicated stuff is inside the bolt and trigger assemblies and most of those come pre-assembled.
Moving on to accessories. The optic is a Leupold FX-I – that’s a fixed 4x28mm rimfire scope. The suppressor and light are the same ones I had on the Savage: a Silencerco Sparrow and a Streamlight TLR-1 HL. And this beautiful sling is from Trunk Monkey Designs – it’s sporting a delightful pattern they call The Woodhouse.
I had been pretty content with my Savage bolt action. Like I mentioned in that other video, it’s been my go-to rifle for almost a decade for pest control and plinking. It’s a heavy rifle, but that wasn’t a big deal because I didn’t have to carry it very far. But, the circumstances have changed a little. Our growing chicken family has been relocated from their coop to an old barn. The barn is much farther from the house than the previous chicken coop. And it is also sometimes mistaken for a supermarket by the local racoon population.
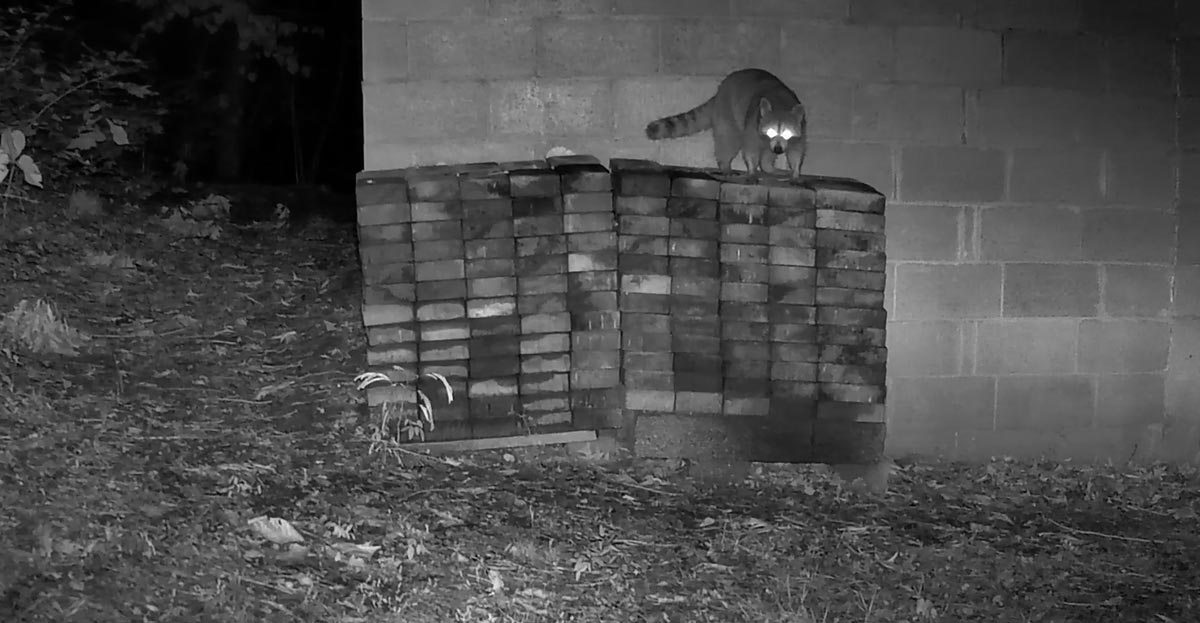
So I found myself carrying my .22 around more often and taking shots at longer range. I could no longer guarantee only head shots like I prefer. Sometimes, I had to take multiple shots to make sure these things were all the way dead. Here’s a great example. I caught this guy red-handed. There goes my Streamlight. I was 40 yards away up on a hill behind the trail cam (so my backstop is the ground, not the barn). He’s about to get whacked as soon as he walks off camera. But it took four rounds. That was on a moving target, from a standing, unsupported position. That’s when I decided that a nine-pound bolt action is maybe not the best poultry protector.
So began the quest for Hen Guardian 2.0 with the following criteria: It had to be semi-auto and lightweight. Ideally six pounds or less, loaded with suppressor, optic, light, and sling. It had to be accurate, which, for my purposes, means 2 MOA or better using everyday non-match grade ammo. And I wanted premium quality parts but within a moderate budget. I’m not ready to spend $2000 on a full custom Volquartsen rifle. But just because it’s a .22 doesn’t mean it has to feel like a cheap toy, either. I wanted the feel and performance of a serious rifle. So I set a budget of $800, not including accessories.
The obvious route for a project like this is a build-it-yourself 10/22. Like I said before, putting the rifle together turned out to be super easy. The hard part was deciding which parts to buy. That is quite a rabbit hole to go down. I ended up reading – I can’t even count how many reviews, articles, and online discussions about various 10/22 components.
I still feel like a novice on the topic. But if I can offer any advice for someone who’s looking into this, I suggest that you decide, in advance, your budget and what you want to do with the rifle. What does it need to be good at? That will go a long way toward helping you figure out what parts to use.
There’s a ton of good advice out there, but context is important. Don’t feel like you have to use a specific part just because some nerd on a forum said it’s the best. If he’s looking to maximize accuracy for bench rest shooting and you want a lightweight backpacking rifle, you’re going to have different priorities.
For my build, I had to make a couple of tough decisions in order to stay under budget. I ended up saving a lot of money by going with a Brownell’s receiver and Ruger BX trigger pack. The Brownell’s receiver is fairly basic, and that’s completely fine for my needs. Unlike the factory version, it does have an integral picatinny rail, so that’s one less potential failure point for the optic.
Most 10/22 trigger assemblies cost two to four times as much as the Ruger BX trigger. This is Ruger’s improved version of the standard 10/22 trigger. This one breaks at three and a half pounds. It’s not bad, but I do miss the two-stage feel of the Savage AccuTrigger. I can always upgrade it later. This one is adequate for now, and it allowed me to spend more on parts that are probably more important.
About half my budget went to the barrel and bolt assembly. Together, these parts are kind of like the heart and soul of the rifle – especially the barrel. This looks like a stainless steel fluted bull barrel, but it’s not. It’s a Tactical Solutions X-Ring barrel, which is a lightweight aluminum sleeve over a rifled steel insert.
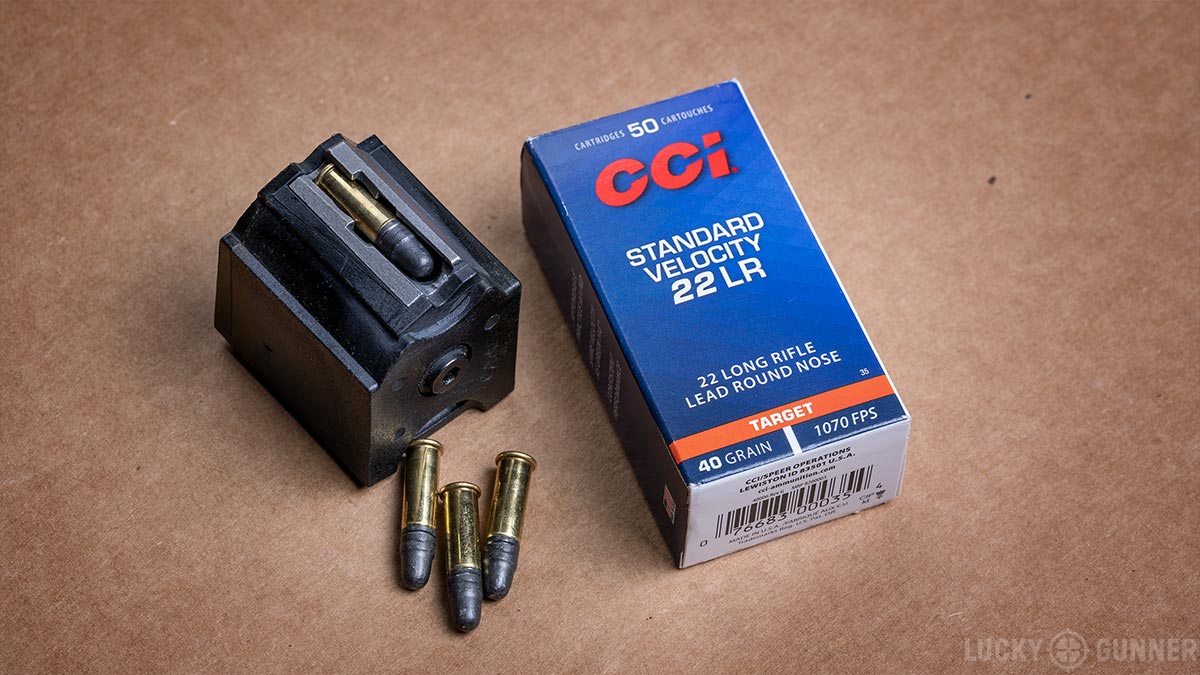
By itself, the barrel weighs just 15 ounces. It’s also proven to be plenty accurate. Lately, my favorite everyday affordable .22 load has been CCI Standard Velocity 40-grain Lead Round Nose. With that load, I’m consistently getting groups between a half inch and one inch at 50 yards. That’s 1-2 MOA, which is well within the standard I was hoping for and at least as accurate as my Savage.
The Magpul stock was kind of a no-brainer. The Magpul shotgun stocks have worked really well for me and the 10/22 Hunter stock has the same basic feel. The comb height and length of pull are adjustable. And, of course, it’s got lots of M-LOK slots on the front for accessories.
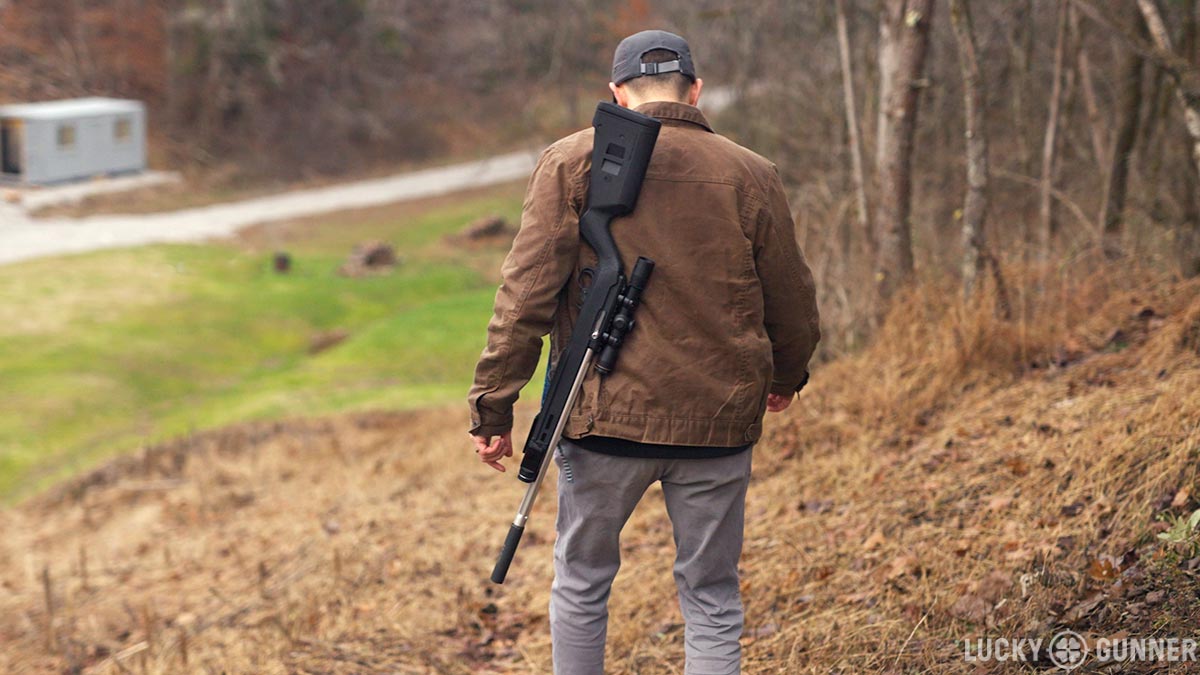
After taxes, shipping, etc, the total cost of the rifle before accessories was $792 – eight bucks under budget. The rifle alone weighs 4.5 pounds. That’s the same as a basic Ruger factory 10/22 with a synthetic stock. With all the accessories and a loaded mag, it’s 6.3 pounds. So just a little over my target weight, but it’s close enough. It’s still very light, handy, and well-balanced – much more convenient to carry around than the 8.7 pound Savage.
The Leupold is one component I’m still not sure about. I have a Vortex Diamondback 2-7 on the Savage. It’s an excellent practical rimfire optic, especially for the price. I thought about just moving that scope to this rifle. However… I’ve had my eyes on this Leupold fixed 4x for several years. Mostly because it weighs next to nothing. On my scale, it came to 7.2 ounces – roughly half the weight of the Vortex.
It turns out that a super lightweight scope is every bit as cool as I hoped it would be. This is probably the best-handling scoped rifle I’ve ever owned. I thought I might miss the variable magnification, but so far that has not been a concern. I usually leave the Vortex set to 4x most of the time anyway. What I do miss is the wider field of view, and the more forgiving eye box of the Vortex. I also think it might be a little brighter than the Leupold in low light. So, time will tell – I could go either way at this point.
The Trunk Monkey sling speaks for itself. I think it sends a message to all of my vermin adversaries. It says “you better hope I don’t shoot as good as I look.” The Trunk Monkey slings are the quick-adjust AR style, but they’re also really handy on traditional format rifles. I can shorten this up and use it as a hasty sling, or cinch it down if I’m carrying it over my shoulder.
I decided to skip the usual sling attachment hardware for this rifle. Sling swivels and QD mounts always seem to click or squeak at the worst possible moment. So I’ve just got the sling running through the slot in the buttstock and this loop I added to the forend. You’d think something this basic would be a common accessory, but it took me a while to find one. This is the CQD front sling mount. It’s just a simple M-LOK compatible sling loop. Of course, I lose the quick detach capability, but now I can be both silent and deadly.
Finally, we’ve got this plate here on the bottom of the forend. This is a Magpul dovetail adapter for the Arca Swiss interface. That’s a dovetail standard used for both camera and rifle tripods. So now, if I want to lay in wait to ambush some critter, I can just grab a lawn chair and my lightweight Leofoto camera tripod, and I basically have a mobile rifle rest.
So far, I am extremely pleased with how this 10/22 came out. I almost want to say it might be my new favorite gun. But ask me again after the honeymoon period is over. Fortunately, what makes this platform so great is that if I change my mind about any of the components I used, I can swap them out for something different in less than ten minutes in my garage.
I hope you guys enjoyed this one. I sure had a lot of fun. If you’ve put together your own 10/22, tell us about it in the comments. I’d especially like to hear your thoughts on third party triggers – which ones do you like and are they worth the cost compared to the Ruger BX trigger? Let me know what you think. And until next time, be sure to get your ammo from us with lightning fast shipping at LuckyGunner.com.
The post The Backyard Sniper – Lightweight Edition appeared first on Lucky Gunner Lounge.